
Generelt |
| Forsiden |
| Om nupereller |
| Hvordan |
| Linker |
| KjøpeKjøpe |
| Bøker |
| Min blog |
Mønstre |
| Veiledning |
| Små motiver |
| Border |
| Brikker |
| Sammensatt |
| Annet |
Drager |
| Drager |
Andre teknikker |
| Kniplinger |
| Nålbinding |
| Sprang |
| Strikking |
English |
| Introduction |
| Tatting Patterns |
| Knitting Patterns |
| Tatted Shuttles |
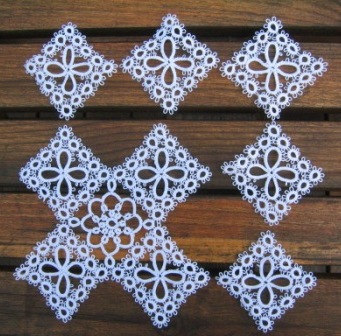
Diamond Antimacassar
This pattern has not been tested after being written out.
Source The Lace Tatting Book by Mlle Riego, 1867.
This pattern has been adapted some from the original.
More antique patterns may be found at The Antique Pattern Library.
You need two shuttles, and to know how to do split rings (SplR)
Make 4 or more squares first. These are to be attached together with the rosettes.
The diagram show how the work is done. Red lines show work done with the primary shuttle (Shuttle 1) and blue lines show work done with the secondary shuttle (Shuttle 2).
Leave a mock picot between the split rings.
Squares
Use two shuttles.
When making the squares, the edges are done first then the four rings in the middle. Make at least 4 squares.
The edge
R: 3x8. (This is one of the corners)
a
SplR: 2-2-2-2/2-2-2-2. Repeat 3 times
SplR: 2-2-2-2-2-2/2-2. (Corner)
Repeat from a 2 more times. Finish the edge with.
SplR: 2-2-2-2/2-2-2-2. Repeat 2 times
SplR: 2-2-2-2+2-2/2-2.
The treads should be at the inside of the edge.
The rings in the middle
SplR: 3+3-3-6-2/3-3-6-2. Skip the corner ring and attach to the middle
picot on the next ring.
R: 2+6-3-3+3+3-3-6-2. Attach to the middle picot on the rings before and
after the corner ring.
R: 2+6-3-3+3+3-3-6-2. Attach to the middle picot on the rings before and
after the corner ring.
R: 2+6-3-3+3+3-3-6+2. Attach to the middle picot on the rings before and
after the corner ring and the last picot on the first centre ring.
The rosettes that holds it all together 
You need 2 shuttles and at least four squares. The rosette is made in one go, do not cut tread between rows.
Centre ring
R: 2x8.
2nd row
SplR: 3/3.
a
R: 4-4.
R: 3+3. Attach to the next free picot on the centre ring.
Repeat from a 6 more times, until all the picots at the centre ring is used. Finish with
SplR: 4/4.
3rd row
B: 6+6+. Attach to the middle picot on the middle R on the edge of one
square and the next picot on 2nd row.
B: 6.
Shuttle 2: R: 6+2+6. Attach to the 2nd free picot in a corner ring on the
same square and the 2nd last free picot on the corner ring on a new square.
Switch back to shuttle 1.
B: 6+. Attach to the picot on the next R on 2nd row.
Repeat for the total of 4 times.
Updated: 21.08.2008 av AnneB